Bud grafting is an ancient art that dates back before 2000 BC in China. It’s a simple process of surgically attaching a budeye, called the scion, of a desired variety onto appropriate rootstock. Grafting onto the right rootstocks improves varieties with weak root systems and increases the vigor and hardiness of frail roses.
Commercial growers graft millions of roses each year. When Angie and I were visiting the Weeks rose fields in Wasco, located in the great central valley in California in mid-May a few years ago, we arrived on a day that Tom Carruth, Weeks director of research, was there evaluating potential new introductions. He volunteered to show us around and, as part of the tour, he brought us to the area where budding teams were grafting long rows of roses, first one variety then the next. What an experience for me as an amateur grafter to actually walk out into the field, with Tom’s permission, to observe up-close these pros who can graft roses quicker than the eye can follow. Two years later, these roses would be available in local nurseries and garden centers.
For grafting to be successful, there are two primary conditions that have to exist. The first condition is compatibility – staying within the same genus, in other words grafting roses to other roses. This may sound obvious but consider that many have tried to graft apples and roses because they are cousins both belonging to the rose family rosaceae. But each belong to a different genus – roses to rosa and apples to malus – and lack the necessary compatibility for one to join the other for any length of time.
The second condition is cambial contact. The cambium is a wall of dividing cells just under the bark that surround each cane, stem and root. Firm contact between the cambium layer of the rootstock and the cambium layer of the budeye is absolutely essential. It’s the cambium from each that will become swollen as they grow together forming the bud union.
Each August, just as the second bloom cycle goes by and roses are actively growing, I set up a budding bench under a shade tree in our rose garden. In my budding kit I have a very sharp budding knife along with budding rubbers, a roll of parafilm, a small container of isopropyl alcohol, plastic plant markers, a horticultural pen, a notebook, and a portable radio for the Red Sox games. The tough, winter-hardy multiflora rootstock which arrived in April in bundles of twenty-five, was planted in two-gallon pots. By August, the shanks of the rootstock are thick enough to support a graft.
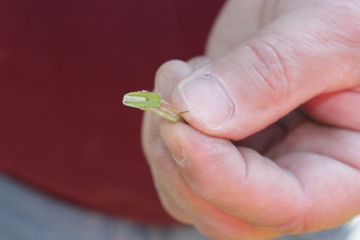
After the August bloom cycle, I pick budeyes from young, but no longer succulent stems, right after the blooms have faded. I carve out the budeyes found in the axils of the leaves with the budding knife. My knife has a rosewood handle and a 2-inch blade that’s honed on one side only for smooth cuts and a knurl on top used as a bark lifter. I select budwood carefully, looking for the healthiest specimens with just the right fit for each individual rootstock which has been well-watered up to two days prior to each budding day. This careful horticultural matchmaking produces superior rose bushes.
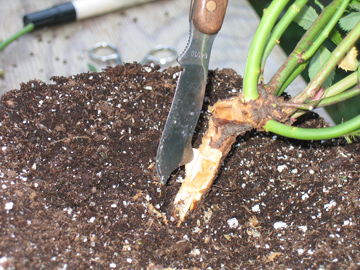
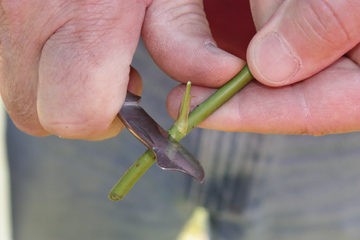
Once the budeye has been removed, I make a clean T-cut in the shank of the rootstock, peel back the bark and insert the budeye into the wound, aligning the cambium of the bud with the cambium of the rootstock, working quickly before the cut surfaces can dry. I finish by wrapping the wound snugly with a budding rubber or a strip of parafilm, immobilizing the graft and preventing contamination. In between grafts I dip the knife blade into a container of alcohol to kill off any destructive microbes that could be present in one plant, thus preventing them from infecting the new plant. It sounds complicated, but it’s not. A professional budder in the California rose fields can graft as many as 5000 roses per day. I do 100 per year. I guess I’ll keep my day job.
See the photos sequence below from left to right: 1. Making the cut 2. T-cut open, ready for budeye 3.Harvesting the budeye 4. Budeye ready for grafting 5. Budeye inserted into rootstock 6. Securing the graft with a budding rubber.
Next, I place the grafted plant in the shade and leave it alone for 24 hours; I don’t water it; I don’t touch it; I don’t even look at it. Success or failure of the graft occurs during this time. I know this sounds superstitious, but it works for me.
After this initial post graft period, I water each pot softly, being careful not to get the wound dirty until a callus, a spongy material, has formed around the graft to protect it. I keep the plant moist until it goes dormant in October.
I bury these plants in woodchips for the winter at Thanksgiving and take them out in early spring. I slowly unwind the rubbers and look at each graft for the first time since they were grafted the previous summer – this is the best part – if the budeye is green then I know it’s a “take.” Voila! If it’s brown or black, then it failed.
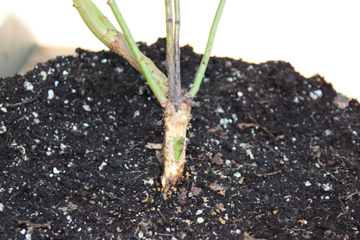
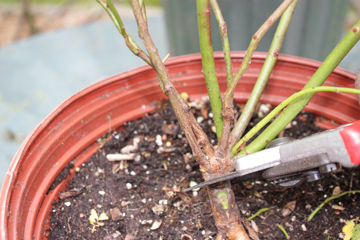
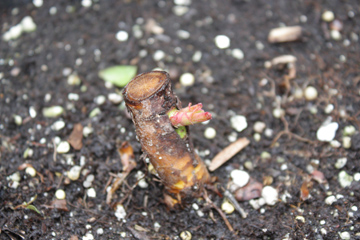
When the rootstock shows signs of new growth, sometime in mid April, I “top” them, cutting off the entire rootstock a quarter-inch above the graft, leaving a stump poking out of the pot with a green bud attached to it. Very bizarre looking.
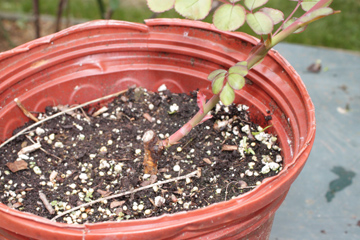
All the energy in the roots now have nowhere to go but into the new budeye. In a matter of days the eye swells up and a new stem begins to grow. The plant has lost its identity as multiflora rootstock and is now a new plant of whatever variety the budeye is. The grafted rose is now referred to as a “maiden.”
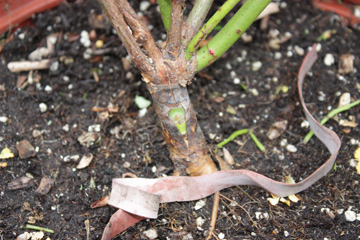
See the photo sequence below from left to right:: 1. Graft – the following spring. 2. Topping the graft. 3. New rose starting to grow. 4. A maiden after 3 weeks.
Two years ago I grafted two different varieties onto one rootstock – an old technique used to make standards or tree roses. (Standards have two, three or even four grafts on one cane to provide symmetry.) However, I am looking to create a novel plant by combining two different varieties with similar growth habits, hoping to avoid one variety dominating the other. I find floribundas are just right for this. I match-up similar bloom sizes and bloom shapes, too but with contrasting colors. I have yellow and purple, yellow and pink, purple and pink, red and yellow, and red and white. I call them Duettes.
For commercial growers, bud grafting gets roses to market quickly and is an effective method of mass producing large numbers of a single variety. But for me, bud grafting allows me to build my collections of rare and hard-to-find varieties like the Brownell Everblooming Pillars as well as develop “super varieties” by grafting superior buds of varieties that I like onto multiflora rootstock, creating ideal roses for a New England garden. Plus, it’s another way for me to enjoy rose gardening.
Copyright © 2011 by Mike & Angelina Chute
Close
|